It is the first time making a game entirely on my own and it rocks!
And when I say entirely, I mean doing everything like the game design, code, art and sound from scratch.
This year's Global Game Jam theme was an audio file of a heartbeat.
Welcome to Cardiary - A world where every thing has a heartbeat:
http://globalgamejam.org/2013/cardiary
----Before Game Jam----
Interpretation of Theme
Before I knew the theme, I already wanted my interpretation of the theme to be on the mechanic level. That meant that I would not take it literally like for e.g. to make a game about real heart beating. I would try to use the theme as a game mechanic instead.
Master Game Developer
I also set myself the constraint that I must do everything on my own. I have been a game programmer for the most part of my working life and I also started doing game music since about a year ago in the last game jam. I have also been learning game design from a guru whom also happens to be my business partner. This year, I am interested to explore art, which is also why my previous post is about the Color Wheel. I feel like a true game developer must be able to wield all the different skills in his or her hand to be able to develop great games. Therefore, I decided I should do this game entirely as a solo artist before the jam.
Diversifiers
We were also notified about the diversifiers before the jam and I chose to use the 16 colors diversifier. This helped me limit my color palette for the jam and seemed like it would simplify the art side of things for me.
----Concept----
Day 1 - 7pm
Mechanic Concepts
Upon hearing the theme, I quickly came to a brief idea or concept I liked. I was thinking along the lines of Wreck-It Ralph where the game world itself is sentient and every thing in the game world has a heartbeat. I also started my concepts with a grid world in mind.
Day 1 - 8pm
Controls and Premise
I thought about using really simple mechanics to showcase the concept because I did the jam the last year and I knew I had to keep simple to make a finished product. I thought about using Left/Right controls scheme on a grid world and I set the goal to reach the top of the screen with the player starting at the bottom.
World Idea
I started to think about Tetris at some point and I thought that having the screen-drop as part of the game world would be cool, i.e. everything on the screen would shift down by few rows every few seconds. I felt this could fit in well with the goal because it would be able to give the feeling that player is trying to swim up a river or something along those lines.
Mechanic
I had trouble thinking about what the player could do to reach the top of the screen. First I thought about stairs or ladders which the player could climb or move the player up to the next row. However, I felt that was too easy and would get very boring quickly, especially if my game were to be on a small 16-by-16 grid. Also, I did not want the game to be side-view just as a personal preference. I then decided that I would add power-ups that could propel the player forward, left or right by two squares. These power-ups would have to be generated in a way that would be beneficial to the player.
Collectable
One other idea I had which I wanted to use was ripped off from the old Raiden games, where there would be a collectable power-up and it would change every few seconds or so. In this game, it would change according to its heartbeat and I thought that would be a nice fit for the concept. I brainstormed about collectables that could perhaps add time to the screen-drop or maybe move the player up by two squares.
No Fail
Another design concept that I wanted to experiment with was that there was no game over in this game. It was only either win or if the player does not actively play the game, it would slowly return to the original 'level one' kind of state. This tied in very well with the screen-drop idea I had so I made it such that the player could never go below the screen and die, rather he or she would just remain in the game space and if he or she played well, he or she would be able to reach the top and win.
Player Challenge
Next, I knew I had to add some challenge and I could add enemies that could shoot to provide some tension and I imagined these would come from the top shooting downwards at you like Donkey Kong's barrels. I knew I could also add spikes that the player could not move into. These enemies would scroll into the screen whenever the screen-drop happened as well, so you had time to see them enter and to plan how you would navigate them. It was around this time that I got stuck trying to think of what else could the player do. The game felt very bare and whatever I added was not really helping to make it interesting and just made things unnecessarily complex.
I got quite frustrated with the basic premise of moving to the top and my mind loitered on changing it to be free-form movement where you could move up and down as well, but that would mean I had to change the goal as well, which I was reluctant to since it would be starting from scratch.
Day 1 - 9pm
After two hours of idea generation and getting stuck, I finally stepped outside the jam site for a while and started to have a really quiet time to think by myself. I realized that I had all the elements for a game but I was not making use of them well.
Mechanic and Player Action
The peace of the night helped. I figured out that I could make it inverted in that there were these up-arrow tiles you could stand on, and they would move you up to the next row on their heartbeats and if you did not step on them on their heartbeats, they would change their column position randomly. So the player basically had this immediate goal of moving to match the arrows position and a long term goal of moving to the top of the screen.
At this point, I got really happy at this point because I knew I had a mechanic that could work and secondly, it was also much better than randomly generating power-ups which the player has not control over to move up.
Day 1 - 10pm
We decided to leave the jam site and head home to rest since the journey would take an hour and a half. That's when I took the bus with Alex, another indie developer who was going to do the jam solo as well, and we talked about the ideas we were going to make.
Enemy Spawning
As we talked, Alex asked if the reaction for the player would be too small once the player reached the top. I did not think reaction time would be a problem but that made me realize that I should not spawn enemies at the top, and instead should spawn them from the bottom. This was because if they were to spawn at the top, you had to navigate around them but it seemed like the difficulty would largely be determined by the spawning algorithm and enemy types. If I spawned them from the bottom I could do things like only spawn enemies as the player progresses to control the difficulty accordingly. This would help because you still have to dodge but the game would get more challenging as you played which would be great for flow. Then an idea hit me. Since the player is travelling upwards and the player has to use the up-arrow tiles to move up, I could easily create an enemy on where the player was standing at the same time as when the player moved upwards.
That was another defining moment for the game because it would mean that the core concept was now solid and it sounded to be really interesting to me as well.
Day 1 - 12am
By this time, I had the core mechanics fixed already but I was still not very sure how the dynamics of the game would play out. I went ahead to start on code first and decided to return to the dynamics of the game once it could be played.
----Code + Design----
Day 1 - 11pm
Grid
While on the way and talking about the idea, I actually also started coding on the bus back. I started with just simply drawing the grid. This was done within about half hour.
At first, I was thinking that the grid would hold entities, so that the entities would be able to check who is in which cell. This was the way I made Cubetractor, since each grid square could have multiple entities. However, having done that before and knowing how painful it was to set up such a system, and I decided not to use any large prior systems I had coded before, also partially due to license issues. So I did not to pursue such a grid system and instead just hack all entities to have a grid coordinate position that they could then pretend to be in grid.
Counter
Knowing that I would be making a game where everything has a heartbeat, I made a counter class which could be used in every game object. This class would just need to be updated every frame of the game and I could set the number of frames it should count up to before it would either block (stop counting) or trigger off some action in the game.
Day 1 - 12am
Next I coded the player movement and controls. I wanted the player to be able to move only in fixed grid positions and he could not for e.g. stand in-between cells. Secondly, I also thought the movement should be frame-based in that he could only move maybe every few frames, which would make him also go in timing with the world heartbeat.
I quickly added a class for this game object and added it to the game as well. With the counter class and player already prepared, it only took me about 10 minutes to get this up and working and I could already play the core mechanic, which was to move the player left and right to match the arrow tile position and at a certain beat, it would move the player up one row.
Production Planning
Before I headed to bed for the night, I decided I would do a little production planning for the next day so that I could pace myself once I woke up. I decided on the following schedule:
- Day 2:
- 8am - 12pm: Compose Music Track because I could then code the game to sync with the beats
- 1pm: Code features in this order of priority:
- Grid (Done)
- Player (Done)
- Up-Arrow (Done)
- End-game condition (EGC) and game reset
- Bottom enemies lasers
- Screen Drop
- Collectables
- Ending Screen
- Expanding enemies
- Special Teleport
- 5pm: Art Drawing (honestly didn't know how long I would take since it would be my first attempt)
- 10pm: Sound Effects
- Day 3:
It was time to sleep. zzZzZzzzzzzZ.
Day 2 - 10am to 4pm
So I managed to complete the music track (more on that below) much earlier than I expected, so I quickly headed back to coding.
EGC and Reset
I wanted to do the end game and reset first because I knew that once I had the structure in place, I could expand on the game all I wanted, but anytime I could not finish any extra features, I could just easily cut them out and the game would still look finished and the player could play to the end. And as I added features to the game, all I needed to was to add their variable resets to the game reset function.
Originally, I thought that I would have two or more enemy types. If you look at my production schedule above, there is another enemy which could expand on its own heartbeat. So I made a system which would be flexible enough to be able to switch between enemy behaviours and sprites on their heartbeats. I did this by having an enemy spawn point which I named EnemyTile, which could attach an Enemy class. If I wanted to have more enemy types, I would derive the Enemy class and the EnemyTile would then be able to swap the enemies types around easily.
On hindsight, once I got the first enemy type down, I lost the urge to make more enemy types because I did not see how much more they would add to the game. Perhaps it was also because I had too many things to focus on, I had no time to go back to the enemy concepts and design again. Anyway, I did not make use of the enemy swapping system at all.
Laser Beams
I then needed to add the missiles the enemies would be shooting out. As a temporary name, I called them LaserBeams and I also needed to add some form of collision for the player to collide with them. Since everything was gridded, I went with the simplest approach which was to just check if the grid cell xy of the two objects are the same, and if so it would collide. I put this into a base class which I could not think of a name for so I called it CollideThing. The CollideThings had a Collide function which I would call when things collided with the player. There were no collisions between two different CollideThings.
Screen Drop
At first I thought this was a big feature, but when it came to actual implementation, it was actually quite straightforward. The first part was of course to add a counter for the world which once it counted down, it would make the screen drop. That was the easy part.
The more challenging area was the actually screen-drop effect. I decided to cheat a little and pause the entire game when the screen is dropping so that I would not have to deal with player input messing around while the screen was dropping. It was also an old nostalgic effect from classic NES games that I liked. I realized that in order to keep the game mechanics synced to the music, I had to work with the 90 frames (1.5 seconds) duration so that the game would skip exactly one bar of music. So I added a blocking counter and set its duration to 90 frames, then initialized the counter to 90 frames as well, because I wanted to just check if the counter was anywhere between 0 and 90, then the game should pause while the screen is animated the drop. Finally to do the animation effect, I just divided the 90 frames by the number of rows it were to drop and basically just drop each row at that specific interval. For e.g. if it were to drop 3 rows, it would happen at the 30th, 60th and 90th frame.
Collectables
I decided the Raiden color changing mechanic was a good idea and that the enemy tile method was a bad idea so I coded this to be just one game object which had 3 different states for different power-ups. I derived the CollideThing class I made for the laserbeams and quickly hacked this together. In the end it all worked out.
Evil Collectables
While thinking of collectables, I thought it would actually be better if I made one of them evil and two of them good, which would then make the players stop to think about whether to get the power-up or not, rather than just anyhow collect powerups. I made this evil one reduce the time of the screen-drop.
After I finished the Collectables code, I decided to move on to Art because I did not feel comfortable not knowing how much time I would need for doing that. So I 'temporarily' stopped working on features and I had a feeling I would not go back to add more entities, which ended up being true in the end.
Day 2 - 12am to 1am
Collectables Adjustments
I managed to playtest the game with a close friend and got feedback on how the game felt. I learned that the power-ups felt really useless and the game had a negative feedback loop where it would spawn many many enemies if the player performed badly by going up to the next row, then getting hit by a laserbeam which would bring the player down one row again.
I started to think about what could be really useful. One idea I had was that since the laserbeams seemed to be a problem, why not have a power-up that could clear all laser beams. Another idea was to destroy maybe one of the enemies spawners so there would be less laser beams in total.
Finally, another rule I added was to clear away enemy spawners which were two rows above the player's current row. This would help to ensure that if the player were very unlucky and dropped down by 3 or more rows, they would be at an extremely disadvantageous position when going back up.
On hindsight the idea to clear all laser beams sounded very cool but turned out be very useless because most of the laser beams would have passed the player already. I ended up switch back this power-up to the reduce screen-drop time.
Day 3 - 10am to 11am
Particles
The game needed particles to give feedback to the player when they got hit or when the enemy spawners were removed either by dropping 2 rows or by the bomb power-up. Admittedly, for this particular system, I took some code from another game I made and put it into the game, but the code I took was not so well designed even though I wrote it, so I took some time to figure out how to use it. Doing that made me learn about how to improve my old code as well.
Day 3 - 2pm to 3pm
Level Progression
I got more feedback from some friends playtesting my game and we talked about how we could better design the level progression. The problem was that it seemed too hard at the start of the game but it felt just nice for a mid-game difficulty. One idea was make the screen-drop slower at the start of the game and have it ramp up as you moved towards the top. I like the idea and started implementing it by changing the world counter. I got into some unexpected bugs which I took another half an hour to fix. And by that time, it was very late into the jam already and I did not want to upload a potentially broken build. So I decided to just keep this build on my computer first and upload it after the jam was over.
----Music----
Day 2 - 8am to 11am
Song Concept
I started the song concept on my guitar as I just wake up and I am still sitting on my bed, which is the normal thing I do for song concepts. I wanted to make a heartbeat song so I started with a double quaver on every bar, like a THUMP THUMP feeling. I just played out what could be a possible bass line and once I decided on the bass line, I went straight to switch on the computer to key it into GarageBand.
Song Name
Before I could I start writing the music, I had to set a name for the piece. I googled online for Heart and found a suitable name for the piece on Wikipedia. I called it
Vena Cavae Bus (link on SoundCloud click here) because I was thinking about how music flows and it transports you through the arteries perhaps into and out of a heartbeat.
Beats Per Minute (BPM)
I also looked up the heart rate of an average human and found it was about 70-80 bpm, so I took that and multiplied by two to get 160 bpm and set that for the music track. Using that I also realized that each bar would be exactly 1.5 seconds for a 4/4 tempo. Since the game was running at 60fps, this meant that I should use 90 frames (i.e. 1.5 seconds) to be able to sync up with the music.
Beats
I knew I wanted to make a song with a strong heartbeat so I picked a drum that could give me a really strong OOMPH and a big THUMP. I had Massive by Native Instruments and I wanted to do like a dubstep thing but I was not equipped with the know-how beforehand so I could not execute it, so in the end I settled on GarageBand's default dance drumkit and I added a Wave Destruction filter over it to make it more chiptune like. It worked!
Song Structure
Originally, I was thinking what kind of song structure I should use. I'll admit right here that I have no music training at all, as in I do not have a teacher or master who I ask stuff. I just make and analyse other people's work. I learned in the previous year from analyzing my favorite Rockman 2 tracks that a 3x structure works super well, in that if you use a 12 bar sequence where every 4 bars are a different set of melody, the music track would magically loop really well and it would hardly get boring at all even if you listened to it 100 times over.
However, I was also noticing a new pattern emerge from recent tracks such as Lifeformed's FastFall tracks from DustForce and other electronic music I have been analyzing where the music generally starts off with a bass line first, then introduces the drums, then finally melody. I decided to try out this pattern in the track I was going to make, but I was also aware that it most likely suited much longer songs where you could have an intro to slowly ease the listener into the song.
After composing for a while, I felt like the song was getting there and I felt like there was not going to be enough time to make a song which was longer than 12 bars. I decided to just stop composing at the 12 bar mark and I had 4 bars of bass, 4 bars of drums, 4 bars of melody. I quickly tweaked the last bar of the melody to make the song conclude.
GarageBands saves the day
As I listened to the track after I thought I had finished composition, I realized the track still sounded a little empty. I then tried to drag in a GarageBand synth loop and immediately liked the end result. It felt more wholistic and also gave the track a new flavour of tension and mystery. At this point, I was happy with it and I exported the track and I considered the job done temporarily. I knew I would get back to it on the next morning.
Day 3 - 7am to 8am
Fixing the Loop
After a full day of listening to the song in the game and also some feedback from a close friend, I could now better hear the mistakes I made in the song and I tweaked the first bass line to be more similar to the melody, so that the song had better cohesion throughout and it could loop without feeling like the song just started again. In other words, I decided to actually combine the intro structure with the 3x structure but retain the best of both. I also made some minor tweaks to the notes because there were some which sounded like it did not belong to the chord. Finally at 8:30 am, I was really happy with result and exported my final version of the song, after which I prepared to head back to the jam site.
----Art----
Day 2 - 5pm to 10pm
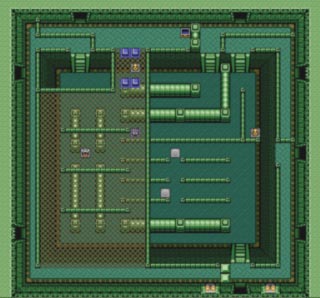
Backgrounds
Since it was my first time doing the art, I just did whatever felt natural. I started with backgrounds and I wanted it to tile. I thought about the real floor tiles in my home and I tried to copy the design.
After I put it into the game, it felt too organic and when it tiled there were too many features which distracted the player so I did not like it. So I simplified it to become this.
Sprites
To be honest, I did not put much thought into the character designs. I went with an upside down heart thing for the main character because I felt it was an interesting silhouette more than anything else. For the lasers, I went with some blood vein ball thing that looks quite gross.
Colors
I think opting for the 16 colors diversifiers was good idea. It kept the palette limited for me and I could select colors quickly and swap them around fast if they did not work.
----Balance----
Day 3 - 11am to 3pm
Once I reached the jam site on the last day and after implementing the particle effects, I got some friends to playtest the game. Honestly, I was very surprised at how people played the game. I personally felt that the game was very easy and made the balance hard to the point I was comfortable with. However, when even my hardcore gaming friends at the jam site could not play the game, I was a little befuddled. I guess it was the first time I designed something to be simple but yet was incredibly hard to play.
After watching two or three friends play, I was convinced that I needed to tweak the game balance such as changing the screen-drop rate or number of rows. This led to the idea that I should add level progression via the rows in the game as mentioned below.
----After Game Jam----
Level Progression Feedback
 |
| GGJ Submission |
|
 |
| After GGJ Level Progression Background |
|
Since I only managed to add in the level progression at the last minute, I was concerned that the player did not have feedback as to why the screen-drop rate was increasing as he progressed towards the goal. I decided to change the background tiles to show the color of which
Better Power-Ups
I also thought about increasing the value of the power-up collectables since they did not seem very valuable. I changed the code such that it would destroy 3 enemy spawn points rather than just 1. Upon changing it, I had a slight hesitation that that would make the game too easy but after playing it myself, I think it would really help the less skilled players which convinced me to keep it.
Player Statistics
On hindsight, one thing I missed out for the end game was adding the play statistics to be shown at the end-game screen. However, I guess that could only be added once I knew what statistics I could track which would mean I could only add it at the end of the development.
Conclusion
I learnt so much from this game jam that I wish I could do it over and over again. As you can see I did not compromise much of my sleep and I do not think anyone needs to compromise sleep. It is all about perfecting the pacing and scope of the project.
< rant >
On a personal level, I feel that other game developers who did not attempt the jam have sorely missed out on the opportunity and it is a immense loss to them actually, especially if making is their passion. It seemed like there were maybe 10 or so game industry folks out of 150-200 jammers and out of the thousands of developers in Singapore game companies. That's like a 0.01% - 0.1% participation from the industry. I guess not everybody sees the value in the game jam in the same light as I do, but I do feel a bit jaded as to why almost the entire Singapore game industry developers do not take part in such a wonderful activity which also coincidentally just happens to be about games.
I was guilty of that myself two to five years ago when game jam started and I did not take part. I guess part of the reason is because the industry folks do not really want to commit to making a game for 48 hours because they are already crunching to make a game in over 1000 hours. Another reason could be because their spouse would not allow it. Another reason could be because they are shy to show their skill. Another reason could be they are not confident in making anything good in 48 hours. Another reason could be they do not want to team up with strangers. But I suspect most of it is just pure laziness and the lack of passion for the creation process of games because there is NO MONETARY REWARD (or tangible reward) in doing global game jam. I honestly do feel quite sad thinking about it. Well, whatever the reason, I do hope to see more game jammers in Singapore especially from the industry.
I think it is incredibly powerful to be able to make a game in 48 hours and finish it while NOT CRUNCHING, because it allows the creator to experience the whole process and also practice the production strategy and designing of features to fit the scope and time. I believe if more people do game jams, they would get so good at estimations of how long they would take to do any game that they would always ship the game ahead of schedule and still have the game to be super polished with attention to fine detail and maybe even easter eggs. No CUTS in design that break the games and no ABRUPT endings and no BROKEN games which need to be patched and updated after launch. I think that is a super valuable skill to have and I am fully aware many people in the industry do not have that skill, which is why it makes me sad that they do not want to join a game jam and improve their development and production skills. Ok rant over.
</ rant >
I had tons of fun.