Showing posts with label flash. Show all posts

Tuesday, 30 July 2013

Weekend Game Jam with HanMD82

Free source on GitHub
Snow Castellum on SoundCloud

Why this weekend?

So one day, Mr. HanMD82 randomly commented on Facebook that we should do a game jam. It was quite random but I love game jamming, so I try not to turn down a game jam offer nowadays, at least if it's done with some friends, we can always rearrange to a timing that works best. So we decided to do a game jam this past weekend.

Why Tower Defense?

I was itching to do a Tower Defense (TD) game because actually I was rather jaded about design cloning in the games industry. So I decided to make a clone for this game jam to learn about the genre and try to see why it makes people tick so much. I have to qualify though, that I play a lot of TD games myself and I love them too. In fact, I've probably played most of the popular TD games. I wanted to also test my game making skills and see how much faster I can build a game if I was already familiar with the design.

Approach

Having made a tower offense game (perhaps the first of its kind), I knew what I was getting myself into, but the difference here is that I would be hacking my way through everything, and picking the fastest-possible/production-efficient way to do the game. I picked up many lessons through making my previous games and I used these lessons to speed up the process in the jam. I'll share some tips here.

1030am Sat - Idea Generation and TD References

We started the jam around 1030am on Saturday. I showed HanMD82 a slew of TD games that were popular including but not limited to the classic Desktop Defense, Kingdom Rush and Field Runners. We then broke down the games and noticed there's a slight variation in design.

We noticed that in Kingdom Rush you cannot choose to place your towers anywhere on the map, while you could do that Desktop Defense / Field Runners. Therefore, as a player, you would solely focus on eliminating enemies and upgrading towers and you need not plan your placement of towers.

Kingdom Rush

Field Runners


Both designs have different implications on the tech that needs to support it. In Kingdom Rush, a way-point system would be used for AI and level design requires way-points to be placed. But for Field Runners, no level design is required but the paths of the enemies will have to be calculated on the fly, typically using an A star algorithm.

For the jam, we decided to go with the latter, but we would be modding the design a bit and have the enemy units move to a fixed location which would be the castle.

1130am Sat - Begin Production!

Because we already knew we'd be making a TD game, we could break down the game into its parts quite easily.

  • Towers (duh)
  • Tower Upgrades
  • Enemy Units
  • Path-finding
  • Waves
  • Projectiles
  • User Interface
And of course, we'll have some art and music to do as well.
From here, Mr. HanMD82 chose to do the Towers, Tower Upgrades and Projectiles, while I worked on the Enemy Units, Path-finding, Waves and User Interface. I volunteered to do the music as well.

From here, we set up the project on GitHub and started setting up the project folder and structure. We chose to use Starling Framework as we were familiar with it, so the project was done in Actionscript 3 (AS3).

130pm Sat - Enemy Units & Movement

I started working on the enemy units and immediately implemented a quick code to control speed and direction. Basically, we have four things we can set:
  1. Speed : the distance in pixels to move per frame or per second
  2. Direction: the angle in degrees to move
  3. VelocityX or Horizontal Speed: the distance in pixels moved in the x-axis per frame or per second
  4. VelocityY or Vertical Speed: the distance in pixels moved in the y-axis per frame or per second
Setting the Speed or Direction affects Velocities, and setting Velocities affect Speed and Direction, so for e.g. we have a function like:
function setSpeed(value:Number):void
{
    speed = value;

    // update velocities
    velocityX = speed * cos(direction * PI/180);
    velocityY = speed * sin(direction * PI/180);
}

The implementation for Direction and Velocities will be left to the reader (or you can just check the code on GitHub). The point here is that suddenly all you need to do to control the movement of an object becomes very easy since speed and direction are more intuitive to us humans, and also explains why direction has to be in degrees instead of radians (a necessary sacrifice for efficiency over code usability). And in the update function, we can just do:

function update():void
{
    sprite.x += velocityX;
    sprite.y += velocityY;
}

After this we had a quick lunch and I continued to work on various small things here and there like setting up the assets pipeline for importing sprites, etc.

3pm Sat - ...

I had to go to do some Remedial Training at this time, as I failed my yearly physical fitness test from National Service (Army). So that's 5 hours gone.

9pm Sat - Pathfinding

After I came back and had some dinner, I quickly dived into pathfinding. I grabbed the Wikipedia A star algorithm and translated it into AS3. Technically, I've implemented A star a few times before, but I decided to do it again from scratch this time as I was confident of getting it done in a few hours or less. The more times we rinse and repeat, the faster we get.

After translating the algorithm for a bit, I remembered I needed a priority queue to implement the openset. I quickly turned (once again) to the Wikipedia Binary Heap and started implementing that too.

As the game was not coded yet, I couldn't really test my code at this point (without diverting to write unit tests), so I left it alone, while I carried on with other stuff.

12am Sun - Castle Art

Was feeling a little itchy, so I wanted to start drawing stuff. I looked up "castle" on deviantart  and found this image:  http://www.deviantart.com/art/Neuschwanstein-Castle-285791596
DarkSilverflame - Neuschwanstein Castle
I really liked it and even thought it was a photo until writing this blog post, so I used it as a reference to make a sprite for the castle. I picked the color palette for our game using the above image.

At first, I didn't think too much and started drawing, and I came up with this:

I quickly put it into the game and realized I need to draw it in perspective!!! I knew we were going for the top-down perspective so I tried drawing some boxes but they didn't turn out so well:

So then I quickly looked up some references, first thing that came to mind is Zelda, so google images led me to:
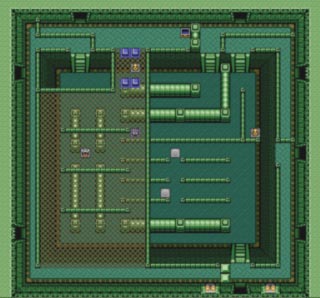
http://zelda.salagir.com/dossier/jeux/castle3.jpg

1am Sun - Sleep

Even though I wanted to finished drawing the castle, it was time to sleep. We don't really believe in crunching, so sleep is good.

9am Sun - Music

Music is the fun part for me. I had some experience writing music for previous game jams so this time it was a little easier perhaps. I came up with the tune while on the bus to training the day before (efficient use of traveling time!) and hummed it into my iPhone, so this piece was done a little quicker than other pieces before. I wanted it to sound a little snowy / cold / icy as well as a little bit epic / Skyrim / Zelda. You can listen to Snow Castellum on SoundCloud

12pm Sun - Back to Castle Art

Learn from the masters! I decided to redraw the castle again with the new perspective. It took me a while, but I learned how to use the photoshop line tool along the way. Here's the result:

It was my first time drawing something this complex so it took me a while, about 1 or 2 hours. I drew it in parts starting with the main keep on the left and adding little towers on castle wall, then the big tower with snowy roof.

2pm Sun - Back to code

After lunch, it was back to code again. At this point, I had not finished the Waves, or tested the Path-finding algorithm. I jumped straight back into creating castle object and the spawn point for the enemy, which I needed to start creating a path for the enemies, which will then allow them to walk from the spawn point to the castle.

230pm Sun - Pathfinding Thoughts

I decided the spawn point should just be an object that holds a grid coordinate, and that the waves object would be the actual one spawning the enemies, since that's where most of the spawn data should be stored.

I also thought that doing an A Star search for every enemy unit would be too expensive, so I thought I could optimize it by allowing enemy units from the same spawn point to share a path and then they would only ever need to keep a reference to one path that would be updated and they would search for the nearest node on the path that they could use to follow the path.

>> In hindsight however, this was a mistake as the enemy units ended up failing to re-route correctly when a player placed a tower in the way of some enemies and they would end up passing through the towers to move to the nearest node on the path.

5pm Sun - Waves

Next up was implementing the waves. I created a SpawnParams class and stored them in the waves object, so that each wave can easily tell an Enemy Unit how to spawn, for e.g. the position to spawn at and the delay to use for the spawn. It was quite straightforward.

6pm Sun - Bugs!

Inevitably the Pathfinding had some bugs. I made some very simple mistakes which I should not have made, like for e.g. my Binary Heap did not test the correct value to decide which node is less than which other node, so that led to some strange behaviour where the enemies would walk through some tiles, then suddenly make a loop around some tiles in a triangular fashion, since the generated path was incorrect.

I also made another bug in the getNeighbors function for the nodes, where I missed out on checking if a grid tile was empty or filled with a tower for the left and right directions, but the up and down directions were OK. I guess it was a code readability issue since I knew to add it to some directions but not the others. 

These were minor bugs, and I didn't spend too much time on them, but I'm just recording them here to remind myself not to make them again. Ok, moving along...

I also added the background, which I actually stole from a photo of a mountain with snow, and then reduced the colors palette to 5 colors, which would create the dithering effect you see here:

background with reduced colors

9pm Sun - More Sprites & User Interface

At this time, I had dinner and took a walk with my dogs. I then started to go back to drawing stuff. I drew the UI for the game start and also drew some sprites for the towers and the enemy units. I added a bitmap font and the castle icon to draw the castle hp:


I was thinking about what to draw for the towers, then started with snowman, then my girlfriend was saying that I should draw a rabbit, and then next a pao (chinese bun). Yes, it's kinda weird, but I like it that way, and I figured I could make it 'reasonable' by adding little army men standing on their heads.

As for the enemies, she wanted a fox-like thing and pumpkin, based off the colors I had already picked. I was not ready to animate anything yet, so I decided to just go with some floaty/ghost-like foxes.

12am Mon - Snow!

I grabbed some crappy (but working) Particle code that I wrote before and dumped it into the game. I didn't really want the code anyway since it was badly designed, but I need something quick to make particles. I drew some quick snow images and added it to the game. After some tweaking, I finally managed to get this:
screenshot with snow particles


2am Mon - Sleep

Once again time to sleep. I was happy with the progress so far. Things were shaping up.

10am Mon - Final Touches

For some reason, in my head, I was thinking this would be a 48-hour jam. So yes, Monday morning is still legit. In the final hour, I added some explosion effects to the enemies. And I also fixed up the game retry so that the player could play again if they wanted.

Overall, I think I neglected design quite a bit for this weekend jam, but I'm still happy with the result so far. I'm also glad I got to draw the sprites and get to practice picking colors.

The current game state is not really playable; the waves are not designed, enemy units and towers are not balanced and we're missing a currency system.

However, here is the current state of the demo anyway for those of you who want it, check my next post!

Sunday, 6 January 2013

Color Wheel, HSV, HSL, RYB, RGB

In my attempt to understand Color Theory better, I decided to make a color wheel in code today. Particularly, I was interested in figuring out how to do a RYB (Red, Yellow, Blue) color wheel. Here is the result:

As you can see, I've only managed to do the RGB color wheel for this post. When I say RYB, I'm aware that it is a subtractive color model and RGB is additive. However, I also mean that Red, Yellow and Blue are equally spaced apart on the wheel, instead of the standard RGB/CMY spacing. I wanted to be able to do this because RYB is actually the natural color spectrum that our eyes can perceive as our eyes react to red, yellow and blue light, something I learned from this incredibly old but insightful video.

Due the difference between RYB and RGB spacing, it occurred to me that the probability of colors in real life is not the same as the probability of the colors we can generate from a computer.

Anyway, here are my learnings from doing this color wheel:

  1. I started off figuring out how to draw a circle or wheel in Flash through code. I knew I could not use the inbuilt drawCircle function as I needed to set the gradient of the circle manually, so I tried to use the curveTo functions in Flash after a quick refresher in control points for quadratic beziers.
  2. Once I did that, I realized that quadratic beziers formed using the corner points of a square does not form a smooth circle. I also did not know how to calculate the control points for generating a circle, given two anchor points from a circle segment. This is why you now see a polygon mesh generated instead.
  3. Flash only allows two types of gradients, LINEAR and RADIAL. I made the mistake of using RADIAL at first but quickly realized that I had to switch to LINEAR since RADIAL is used for a gradient which interpolates from inner circle to outer circle.
  4. However, LINEAR is not ideal as well since it cannot deal with segments of a circle and rather deals with boxes. You can see this effect in the demo above. The gradients interpolate smoothly on the outside edge of the wheel but it is not smooth near the middle of the wheel.
  5. When calculating the matrix for the gradients of each segment, I used an inbuilt function from the Matrix class called createGradientBox. I lost quite a bit of time figuring out this matrix. It was only after I made another Flash tool to interactively see what is happening with the matrix that I realized what was wrong. Flash automatically calculates the offsets (tx,ty), based on the box width and height that was passed in, but the way I was drawing the mesh was with a radius offset, so the solution was to set the offsets (tx,ty) manually after the matrix was created.
  6. After I managed to chop out the segments and get some gradient filling to work. I finally started looking into how to calculate the color hues. I found out on StackOverflow that there was a wiki page on HSV/HSL, which I then used to code the formulae.
  7. The HSV and HSL algorithms are similar, but I would recommend HSL since the spread is of lighter colors are more even as compared to darker colors.
  8. One of the limitations perhaps of the conversion of HSV/HSL to RGB algorithm is that it depends on dividing the hue into six main colors, namely red, yellow, green, cyan, blue, magenta. This means that when you start using a large number of sides to form a circle, you end up with a majority of segments in these primary colors.
    I made a mistake with the hue equation and got the above striked-out behaviour. It was due to the fact that I thought I should floor the h' in the equation to check which segment to apply the respective formulae. The hue now works perfectly on large number of sides.
  9. Part of the problem here is that I could not set the color for each vertex, which is also why I realized I should have made this wheel using triangles on the GPU instead of using Flash gradients. But since this is done, I leave that as a future project.
  10. In summary, if I were to redo this, I would use vertex rendering and the GPU to blend the vertex colors together. On Flash this would mean using Stage3D, or in C++, OpenGl or DirectX are both available.

Sunday, 4 December 2011

Flash PID Controlled Steering


I was introduced to the concept of using a PID-Controller during one of my university modules in games, and I had always thought it was an easy and useful algorithm for game AI, especially for missile-like behaviour, but I had not attempted to implement it until today. Fortunately, I'm equipped with the original source, i.e. AI Game Programming Wisdom 2, Chapter 2.8 Intelligent Steering Using PID Controllers by Euan Forrester (EA, Black Box).

I started by reading the text and trying to implement the algorithm based off my understandings of the text alone. However, I got a little stuck at several parts, after which I had to reference the source code to solve them. Overall, I think that helped me learn more as I could compare my original understanding and the source code to see where I went wrong. Here is what I learned:

  1. The PID Controller should be used to influence the direction or angle of the missile, not the position. Originally, I rushed into the code and got "bitten" because I instinctively tried to calculate the difference between the positions of the target and the missile, rather than the angle.
  2. The output of the PID Controller for missiles behaviour should be an angular acceleration. This means that the missile is required to have an angular velocity as well. This does not seem to be mentioned in the text, so it may be hard to figure out by yourself unless you have an engineering background where PID Controllers are used.
  3. The output of the PID Controller should be a negative feedback to the system. This was only obvious to me when I saw the diagram on Wikipedia where it is clearly shown that the feedback should be negative. If the feedback is positive, what you would see is that the missile would start turning away from the target rather than towards it. Perhaps this behaviour can also be exploited for other purposes.
  4. The movement of the missile can and should be independent of the PID Controller. I.e. the missile should move based on its own velocity or acceleration and should be agnostic to the presence of the PID Controller. The PID Controller should only be used to influence the angular acceleration of the missile, somewhat like the wind.
  5. Angular velocity drag force and Clamping the angular acceleration is a good idea. At first when the algorithm was not properly implemented, I found the missile spinning like crazy, so it's a good idea to have a drag force to always reduce the angular velocity as well as a cap for angular acceleration so as to avoid crazy spinning.
  6. The rest of the algorithm is actually pretty straightforward! Aside from the above, it does seem my original implementation was not too far apart, but I definitely would not have been able to complete this demo in time if not for the source code.
  7. P stands for Proportional Gain and it is useful to think of it as the "now" variable. The higher it is, the more the result will react to its current situation. Too little might seem lazy, too high might cause the result to be unstable because it is always overreacting.
  8. I stands for Integral term and it is useful to think of it as the "past" variable. The higher it is, the more inertia the result will have as it puts more emphasis on what its past errors has been. Therefore, it tends to overshoot the target.
  9. D stands for Derivative term and it is useful to think of it as the "future" variable. The higher it is, the more it will try to predict the future and will try to slow the rate of change of the result, especially if it is going to overshoot.

Saturday, 14 May 2011

Flash Dynamic Sound Generation 2: Musical Notes


Today I learnt how to produce musical notes in the equal temperament tuning using Flash dynamically generated sound. If you would like to see how I dynamically generated the sounds, you can check my previous post here.


Essentially, music notes are just certain frequencies, so I could reuse the different wave-forms I did previously to produce them. Now all I had to do was to find out how to determine the frequencies of the notes. The formula to produce the notes was:


Frequency = 2 ^ (n/12) * 440;
where n is the number of semitones relative to the note A4 which is 440 Hz.


For e.g. for the note A#4, n is 1, therefore the frequency is 2^(1/12) * 440 = 466.16 Hz. If you're not familiar with the note names, it is basically the note (A#) followed by the octave number (4).


Actually, the formula is quite intuitive if we think about it. There are 12 semitones in an octave and each octave is double the frequency of the previous octave. Using this information, we can tell that if we want to double in frequency we need to multiply by a factor of 2. However, we only double every 12 semitones and that is why we need to divide the semitone number by 12. Finally, there is a reference frequency which we need to use and the standard frequency to reference is the note A4 at 440 Hz.


As shown, calculating musical note frequencies is pretty easy and now I'll show how to convert the semitone number into a note name. I.e. Given the n = 2, let's find out how to get the note name "B4". Here's my code with the explanation below:


function NoteNumberToName(noteNum:int):String
{
// number from -69 to 58
// assumes noteNum 0 is A4

// octave number is counted from C, so we have to add an offset
// noteNum 0 is octave 4
var octaveNum:int = Math.floor((noteNum + 9) / 12) + 4;
var octaveNumStr:String = octaveNum.toString();

var octaveNote:int = (noteNum+69) % 12;

var returnString:String;
switch(octaveNote)
{
case 0: returnString = "C"+octaveNumStr; break;
case 1: returnString = "C#"+octaveNumStr; break;
case 2: returnString = "D"+octaveNumStr; break;
case 3: returnString = "D#"+octaveNumStr; break;
case 4: returnString = "E"+octaveNumStr; break;
case 5: returnString = "F"+octaveNumStr; break;
case 6: returnString = "F#"+octaveNumStr; break;
case 7: returnString = "G"+octaveNumStr; break;
case 8: returnString = "G#"+octaveNumStr; break;
case 9: returnString = "A"+octaveNumStr; break;
case 10: returnString = "A#"+octaveNumStr; break;
case 11: returnString = "B"+octaveNumStr; break;
default: returnString = "invalid"; break;
}
return returnString;
}


First of all, the range of notes I'm using is the same as the range of notes available in the MIDI system i.e. 128 notes from C-1 to G9, see here. I'm also taking in the input as a number relative A4 so note A4 is 0, C-1 is -69 and G9 is 58. However, you may wish to change this to a zero-based index if you like.


The quirky thing about note names is that it starts with C while the reference frequency starts from A4, so we have to add an offset of 9 since C is 9 semitones below A. So to get the octave number, i.e. the "4" in "A4", we just divide the note number by 12 semitones and add 4 since a note number 0 translate to A4.

Finally all that is left is to get the note itself, and to get this, we do a modulus operation and a switch case for the 12 different semitones. I figured there was no formula to determine the notes due to the uneven nature of having no semitone between E and F, and between B and C, so a switch case is ideal. If there is a formula, please do post it in the comments!

Flash Dynamic Sound Generation 1


I messed around with dynamic sound generation in Flash today, inspired by some of the interesting websites like Tone Matrix and Otomata. I created a Flash swf for testing frequencies and wave-forms.

At first I didn't know where to start so some search results turned up this useful link from Adobe. Also found this site which gave a really simple sample code which I decided to try out. However, the code did not produce any sound so I looked up the docs on the SampleDataEvent and worked from there.

Things I learnt :
  1. The number of samples should not be lower than 2048, as recommended by the docs. This is because it may cause the sound to stop playing if there is not enough data, which is why my computer did not produce any sound. The number of samples are just used as buffer and do not immediately play on the next update.
  2. The callback is only called when the buffer is running out of data to stream. I felt this was not clearly explained in the docs. So essentially setting the samples to 2048 or 8192 has no effect on the sound produced. When you update 8192 samples in one update, it just means it will take a longer duration to call the callback again to refill the buffer. However, the drawback of setting a higher sample number is that it will also take up more processing time for that update.
  3. The data is always played at 44100 Hz. This is stated in the extract function of the Sound class, however, it is not reiterated in the SampleDataEvent docs, so it confused me. I'll explain why this detail is important later in (7).
  4. Wikipedia taught me that the sin wave has a rather complex general form which we seldom see. I tried playing around the DC offset in Flash but I could not tell the difference between the sounds. In essence, we only need the simple form i.e. y = A * sin ( f*t ), where A is the amplitude and f is the frequency we want.
  5. Originally I was thinking that square, triangle and sawtooth waves had to be generated by Fourier series and adding sin waves together, which is what I remember from physics class. However, through Wikipedia I found that there are simpler methods to generate these waves. For e.g. square waves can be generated simply by just using the sign of the sin wave, i.e.:
    y = -A if sin (f*t ) < 0
    y = A if sin (f*t) > 0
    In code, this would be simply: y = (sin(f*t) > 0) ? A : -A;
  6. Originally I also thought that the speed of sound was required to generate real sound frequencies. This is because we need to map the wavelength into the generation process using the frequency equation, f = v/w. However, this is not the case as we just need to set the correct wavelength for the sound to be played in the air, so we do not need to account for velocity. In other words, frequency = 1/wavelength and this meant we could directly use the frequency in our equations.
  7. The units are important! As with all mathematical calculations, making sure the units are consistent is very important. At first I was trying out with f = 220 Hz; A = 0.25, i.e. using equation y = A * sin(f*t), I got y = 0.25 * sin (220*t). Although this seems correct, this gave me the wrong sound. The problem here is that I made the wrong assumption about the units for the equation. Instead of t being time, we are actually using samples instead. The samples are playing at 44.1kHZ mentioned in (3). Therefore, the correct equation is instead y = A*sin(f *(s/44100)), where s is the sample number. This took me a while to figure out so I hope it will save you some time.
  8. Keep in mind the periods of the waves. While figuring out how to generate the sawtooth and triangle wave forms, I got a different tone from the sine and square wave forms. I figured out that I needed to multiply 2π to the sine and square wave forms because they are using the sine function but not to the other wave forms.

Friday, 11 May 2007

Security Exchange Flash Game

I made this game originally for another website but reused to code for this game and changed all the graphics. The graphics wasn't done by me but I was the integrater and programmer so I had to replace all the symbols and stuff like that. I got the job because the company in-charge of this posted a request for help on the IGDA Singapore forum and I replied.

I'd say I was quite satisfied to do this job because I had the code mostly there and the graphic artist was also producing nice stuff for the game as you can see so it was nice to work on it. My only qualm was that I realised I quoted a price abit too low compared to the normal market rate which I shan't forgive myself for. Bargh! Just a shoutout to all flash developers out there: I don't care who you are, what you do, but please don't undercut the market rate. Its bad bad bad.

About the game, its basically arkanoid or breakout whichever you're more familiar with. You control the paddle at the bottom with your keyboard by moving it left or right and trying to keep the ball in the play area and smash tiles to gain points. Occasionally, powerups or powerdowns may drop from tiles and the player can collect them the icon hits the paddle.

I can't really post the game here so here's the website it was hosted on but the game has been taken down after the event.

and here's some screenshots:


title

instructions page 2

first stage

eigth stage

stage complete

game over

Thursday, 10 May 2007

Flashit Competition

I posted this because I wanted to post something quick to fill up my blog =P.

I took part in a flash competition in my University. oh nope, I didn't win anything. =P Kinda sucks. oh well.. I think the winner did some flash animation. How would a flash programmer compete with a flash animator? By making a game of course. But anyway apparently, the organisers delayed in giving out the prizes. I know because they sent out an announcement saying that. But I do wonder whether they gave out ANY prizes... hmm..

I did this game in 2-hours, the duration of the competition. I did everything you see. Graphics, code, etc.

so here's the poster of the competition in a freaking lousy quality but extremely bloated size (i had to re-export it to reduce the size but i assure you the quality was the same as before; it was like 2550x3300,300dpi and i changed it to 300x388,72dpi reducing the file size from 589kb to 35.2kb; if you still don't believe me see http://www.ieee.nus.edu.sg/index_files/Page1118.htm):


so here's my entry, i do admit its not really good but the topic was only given when the competition started and i only had two hours so there:


would love to hear your comments.

Jungoroll

My first attempt to write music for games was induced by the fact that I had some friends who wanted to do a game together and we were all mostly programmers except one who was a game designer. Since no one was knowledgeable in music (I wouldn't say I was too because my music theory isn't too good; i knew abit on chords and notes as i play the guitar), i decided to do the art (which i'll document another time) and music for the game.

The game was called Rollo and it is a flash game and it was mostly developed under 15hrs but is still currently in development and is about to be completed very soon. Its about an armadillo trying to find tasty but awfully cute bugs to eat while avoid obstacles. Here's a screenshot but no link yet because we have some agreements with our client to let them host it on their site exclusively for the first three months so we'll have to finish the game, put it up on their site and then i can link to there.
title
credits
in-game 1
rollo in walk mode can eat bugs

in-game 2
rollo in roll-mode can jump
but can't eat bugs

So anyway this post isn't meant to be completely on the game but its music. So here's the music i wrote. Give me comments if you like. I'm especially interested to hear what is the closest song it sounds like to you. i'm putting up the mp3 because it sounds a bit better than the midi i wrote.


As you are listening to it maybe I'd share about how I came about the piece. Well I first thought of the constraints for the music such as the feel of it (happy), the style (jungly) and so on.. I then picked up my guitar to try out some tunes. Somehow it occured to me (because of the happiness factor) that it would be nice to have a kinda of tune which uses most of the notes in a key (musical jargon i know but i won't explain it now). So i kinda played Do Re Mi Fa So La from the A note on the guitar (last string, 5th fret) and was playing around with it from there. Then it kinda evolved from there.

After writing the main tune, I worked on the chorus which was actually a sort of random rehash of the main tune. After that, I felt the song was too short because I needed it to loop infinitely and didn't want the tune to be irritating so I needed to write an additonaly section at which I kinda got abit stuck. So i kinda stalled on that for a few days before getting to come up with something.

Also to create the bass track you hear in the background, I was playing around with the notes on Anvil Studio. I would play the main tune and try to think of some kind of tune that would fit it as it was playing and quickly click the notes in the studio. As you can tell it was kinda a semi-random thing as well (semi because I doubt anyone's brain is random, its some patterm recognition neural stuff or something like that). I did that because I didn't quite want the bass tune to be repetitive so I decided to go for a tune as well.

Oh as for the percussions, it was kinda a random thing. I picked some percussion instruments (whichever i thought could be jungly) in Anvil Studio and started to lay them out like according to some pattern. However, the pattern for each instrument was different and did not have to follow the "beat" of the other instruments.i put "beat" because its like say the drum could go 3 times in a bar but the hat could go 4 times. After doing that, i just adjusted whatever i found was not nice by ear and changed some instruments to perhaps suit others if they were too constrasting. Therefore the outcome as you hear now..

after-blog note: As i was trying to upload the above player and the mp3, I happened to find out that flash media player (i.e. the component i used as you see above) actually doesn't support all types of mp3s! I originally used Audacity to produce my mp3 file in 48kbps bitrate but it ended up playing really fast (like 2x the original speed, some call it the chipmunk effect). So i had to play around and i found that the lowest i can go for the bit rate to play like normal is 64kbps. i'm not sure if Adobe fixed this is Flash CS3 because my current version of Flash is Flash 8 but i'm just complaining about it here haha.

So if you're wondering how to embed the above flash mp3 player into your blog or webpage, i'll share it with you in another post another day. its actually very easy because you can use a pre-built one that comes with flash as i have done but this post is really getting too long =P

after-blog note 2: I originally had a flash music player there to play the file but since I lost my hosting space, I decided to put the files on Youtube and that meant I could not have the flash player anymore.

Tuesday, 8 May 2007

flash frame rate

I just made my first flash frame rate widget. I wanted to have a frame rate widget because I'll soon be experimenting some processor intensive stuff in flash. It took me about 10 mins to make because it's really simple.

here's how to make it:
1) create a new movieclip symbol and navigate to its timeline
2) create a dynamic text box for the number to update itself
3) add a new layer for actionscript and add the following:

var frameCounter:Number = 0;
var frameRate:Number = 0;
var currSecond:Number;
var prevSecond:Number = 0;

this.onEnterFrame = function()
{
frameCounter++;
currSecond = int(getTimer()/1000);
if(currSecond > prevSecond){
prevSecond = currSecond;
frameRate = frameCounter;
frameCounter=0;
}
}

4) add "frameRate" without quotes to the dynamic text box you created above under the "Var:" box in your properties window.
5) decorate as you please, by adding a background box and border and the word "fps" inside a static text box, etc

i guess the code is self explanatory if you're a programmer, but for the non-programmer who isn't interested to learn programming but is wondering how it works, basically what it does is count the number of frames that flash can update per second and update the number in the box every second. its that simple.

i also just realised that flash can go up to a maximum of 120 fps (upper limit set by macromedia). tt's pretty gd but not great like c++ graphic engines. so all you c++ fans out there don't come complaining to me that the frame rate sucks. It reasonably good and 60 fps already provides ultra smooth animation, though the more stuff you have on screen makes the frame rate dip quite abit. i've been using like 15-20 fps for a long long time so i think i should be trying to push the fps for future projects up.

one thing though is that i tried running the the flash swf on my computer in flash player and it runs at 120 fps-124fps.
but running it on my mozilla web browser runs the same swf at 60fps to 90 fps only. I suspect the dip in frame rate is due to the flash file being run from the browser so its slower. Its an operating system thing.

and finally here it is:

Get Adsense

Want to earn money like me? Get Google Adsense now by clicking this