Ok, this is another assignment from my computer graphics module. The first one in fact. We were to put in the code which could morph pictures.
How does it work? Well, first you got to watch the video once. Then notice the red lines near the end of the video? Those are the guides to the morph. What the program tries to do is move each red line in the source picture (cat) closer towards the corresponding red line in the alternate picture (dog). As it is moving the lines, it calculates the pixels which need to be stretched or changed during that frame according to a mathematical formula. Well, actually its abit more complicated than that but that's the gist.
For the video above, I am actually trying to show you the different modes of the program. What I did not show was the long computation time it took to calculate 24 frames for that second. It took about 3 to 4 seconds to compute each frame. So nope, morphing using this algorithm is not real-time! As for the modes, I first showed the source and target blended morph, then the source-only morph (cat), then the target-only morph (dog), then blended with the guides. Blended meaning an interpolation of transparency. So the cat is 0% transparent and the dog 100% on the first frame. The cat 50% and the dog 50% on the middle frame. The cat 100% and the dog 0% on the last frame.
I did not really find the assignment hard since we were given an algorithm to follow but I did learn alot from this assignment and was really amazed at how maths could be used to manipulate so many things. It was also only in this module that I realised Adobe Photoshop was all about powerful maths. Yup all your strange effects and tools are all essentially some kind of formula. Some are really complicated and thus the slow computation times and some are really straightforward and fast. Oh and I would also like to state that I did not do all the programming. Most of the framework was provided by the lecturer and we only had to fill up the morphing algorithm.
well that's all for today! (lucky i found out how to do the video stuff yesterday so this post only took a short time) Oh but i did find out more about the flv player today. A surprising fact that it can actually have a different frame rate from the swf it is contained in so that videos of different frame rates will all be played at its correct frame rate. This is unlike the rule where a swf contained in another swf will follow the frame rate of the parent swf. Also, the flvplayer can resize itself to fit the video it is play. This is a really wonderful feature because that means I can use one player for all my flv videos of different sizes and frame rates. Awesome.
More computer graphics stuff for the rest of this week! I have decided to make this week Academic-related Posts week.
Showing posts with label academic. Show all posts
Showing posts with label academic. Show all posts
Monday, 21 May 2007

Sunday, 20 May 2007
Computer Graphics Lab 2 : Fly text
This flying text animation was done in opengl. It was an assignment given to us during my computer graphics module and we had quite alot of fun with it. Our lecturer wanted to give us some freedom to express our creativity but was also surprised at what all the students came up with. For my assignment, I chose not to use any pictures and went for the ascii art theme, using only text in opengl. I think he was particularly pleased with the fireworks explosion of '@' symbols.
Everything you see in this video was programed by me. I used abit of procedural animation (the ball and the firework particles). If you're wondering what procedural animation is, it is animation which is done by program code or math unlike the normal animation where everything is placed manually via some editor and the positions are recorded and played back.
The scenes were done with a simple switch case statement with a timer clock to determine the start and end of each scene.
The colour changes were done by interpolating the color using the same clock by a mathematical formula.
here's the code snippet for drawing the ascii faces:
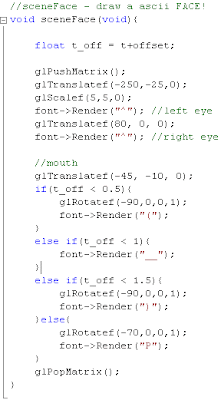
and here's the final product:
after-blog note: wow this post caused me more trouble than i expected. I found that the flvplayer component provided by flash could not load the skin for the buttons. ok let me explain. This blogger site does not allow me to host swf files so I am uploading my files to another server and linking to there. However, I found that the flv (flash video) could play but the skin could not load resulting in the entire playback button panel not showing up. So I added some code and found that the player for spitting out a skinError saying it is unable to load the file. After googling for some time, I finally found this (really hard to find) page from adobe.
But i did not like their solution because that brings me back to the problem of how to upload swfs to blogger. So what i did was instead use iframes. A quick guide by w3schools here.
And voila! it worked. Only bad thing about iframes is that if you size it exactly to the swf, the scrollbars may show up. So you may have to use trial and error to get the iframe size right. Here's and example of the iframe code I am using (i added back slashes to get the browsers to show the text instead on try to parse it as html code) :
\< src="http://yoursite.com/yourswf.html" align="middle" frameborder="0" height="270" width="420">
Everything you see in this video was programed by me. I used abit of procedural animation (the ball and the firework particles). If you're wondering what procedural animation is, it is animation which is done by program code or math unlike the normal animation where everything is placed manually via some editor and the positions are recorded and played back.
The scenes were done with a simple switch case statement with a timer clock to determine the start and end of each scene.
The colour changes were done by interpolating the color using the same clock by a mathematical formula.
here's the code snippet for drawing the ascii faces:

and here's the final product:
after-blog note: wow this post caused me more trouble than i expected. I found that the flvplayer component provided by flash could not load the skin for the buttons. ok let me explain. This blogger site does not allow me to host swf files so I am uploading my files to another server and linking to there. However, I found that the flv (flash video) could play but the skin could not load resulting in the entire playback button panel not showing up. So I added some code and found that the player for spitting out a skinError saying it is unable to load the file. After googling for some time, I finally found this (really hard to find) page from adobe.
But i did not like their solution because that brings me back to the problem of how to upload swfs to blogger. So what i did was instead use iframes. A quick guide by w3schools here.
And voila! it worked. Only bad thing about iframes is that if you size it exactly to the swf, the scrollbars may show up. So you may have to use trial and error to get the iframe size right. Here's and example of the iframe code I am using (i added back slashes to get the browsers to show the text instead on try to parse it as html code) :
\< src="http://yoursite.com/yourswf.html" align="middle" frameborder="0" height="270" width="420">
Subscribe to:
Posts (Atom)